 I’ve followed Athina Kakou for a while now, on both Instagram and You Tube , so when she posted asking for sewists to join her Pattern Review team, I jumped at the chance to apply. Athina has released a number of sewing patterns, first as part of SMYLY patterns and more recently under the name AK Patterns . Her sewing patterns are feminine and flattering, aimed at women of all ages, shapes and sizes. Each pattern is named after a lovely lady in the sewing community, and this cardigan has the wonderful Nikki of The Stitch Sisters as its muse. I loved the look of this pattern as soon as it was released, so I was thrilled to review it for Athina.
The pattern
The Nikki Cardigan is a wrap-style cardigan aimed at beginner sewers. It comes in two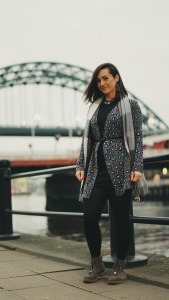 different lengths: a short style, sitting just below the waist, and a longer hip-length style. It has a tie-belt and optional belt loops and can be worn open or closed, depending on your preference. The cardigan has no difficult techniques, no fastenings and little fitting, hence it being perfect for beginners.
It is designed for light-medium weight knit fabrics with four-way stretch, such as a cotton jersey or a ponte di roma.
The pattern, as with all of Athina’s patterns, comes in a fantastic size range of 4 – 28.
It is currently only available as PDF, downloadable from Athina’s website , although there may be the possibility of paper patterns in the future, something which Athina has herself discussed.
In the first few months of my dress making journey, I was a ‘paper patterns only’ girl. I loved the excitement of them arriving through the post and being able to display the beautiful pattern envelopes in my sewing room. But a couple of months ago, I tried my first PDF pattern and it was a revelation! I actually loved the instant gratification of clicking purchase and it arriving in my inbox seconds later. A lot of people dislike the process of assembling a PDF pattern, but I quite enjoy it. My preferred method is to use a glue stick, although the sellotape sometimes gets involved for added stability.
When I first received the email with the links to the PDF Nikki pattern, I had some technical issues. I contacted Athina and she was wonderfully helpful, sending me the patterns via a different method. As it turned out, I just needed to try opening them on a different device! Athina’s speed of communication gave me great confidence that if I were to have any queries throughout the making process, she would be there to help.
So, I downloaded the PDF pattern and instruction booklet, printed them out and got to work assembling and cutting out the pattern.
The fabric

I chose to use a fabric that I already owned – a leopard print grey jersey from Loubodu Fabrics . I only had 1.5 metres of fabric, yet I wanted to make Version 2 (the longer style) in a size 12, which required 2.5 metres of fabric! I wasn’t put off, however, and I love a challenge. With a bit of creative placement of the pattern pieces, including cutting the hem band in two halves and sewing them together to create the length of piece needed, I succeeded. I wasn’t able to squeeze the tie belt or belt loops out, but this didn’t bother me as I knew I had a belt that would match perfectly well.
The process
The instruction booklet for the Nikki cardigan is beautifully designed: it’s clear, excellently explained and has great diagrams throughout. I especially love the font that is used for the headings – simple things! Although I didn’t need any assistance, I still watched the sewalong video out of interest. This is a fantastic bonus that comes with Athina’s patterns and would be really useful if you got stuck with a particular step or just fancied a helping hand when making your garment.
 I constructed the entire cardigan on my overlocker, which made it a really quick sew. The fabric was great to work with and I didn’t come across any problems during the making process. Well, that is until the last step! After attaching the neckline binding, Athina recommends topstitching the seam allowance to the cardigan’s bodice to help the neckline binding stay flat, but I didn’t have a suitable colour of thread in my stash. I tried on the cardigan, wondering if I could be lazy and get away with missing this step, but I couldn’t – it would have given it a sloppy finish. So for this reason, my Nikki cardigan lived on my dressmaker’s form as a ‘UFO’ (Unfinished Object) for a number of weeks.
When I eventually remembered to purchase some complimentary coloured thread, I was then able to finish it off by topstitching with an even zig-zag stitch. I tried to do this starting from one end and going all the way round to the other end, but my machine did not like that and was getting tangled at the beginning. So I solved the problem by starting at the centre back of the neckline binding and top stitching down one side before repeating this on the other side. I tried it on and was delighted – such a simple step had given such a neat, professional finish to the garment.
For the photos (Which were taken by my husband, Sam, on Newcastle Quayside) I have layered the cardigan over a simple black silhouette of opaque tights, a long sleeved top and a short, stretch skirt. I added a skinny black belt around the middle, in some photos having wrapped the front bodice pieces of the cardigan over each other and in others, leaving it open. I hope this shows you the versatility of the garment and the different looks you can achieve. You could, of course, leave the belt off altogether, but it was the 3rd of January in Newcastle, so I needed all the warmth I could get!
To conclude…
I am really happy with my Nikki cardigan and see me getting a lot of wear out of it. It is perfect for layering and could be dressed up or down. It is comfortable enough to wear for work, but also stylish enough to wear for many social occasions. I will definitely be making another version, perhaps in a lighter weight knit fabric in time for the warmer weather (well, as warm as it gets in the North East of England!)
Athina’s instructions really are excellent, so I would recommend her patterns to sewists of any level. As mentioned earlier, the sewalong videos are a fantastic resource that come with the patterns too, as well as Athina’s willingness to give advice and support when needed.

If you don’t already follow Athina on Instagram and You Tube, I would highly recommend it. She posts regular videos, such as fabric hauls and ‘makes’ videos. She is also the Queen of hacks, offering many suggestions on how to create multiple different versions from the same basic pattern (Watch this video for an amazing 15 hacks of her Sheona pattern ).
Thanks for reading this review. I’d love to hear if you have made the Nikki cardigan already, or if this blog post has convinced you to give it a go!
Happy sewing and happy new year,
Tamlyn xx
 The
The 


 The only change I made to the pattern was to grade from a size 4 on the bodice and waist to a size 5 on the hips. It was such a straight forward make and it is unbelievably comfortable (Definite secret pyjamas!) I’ve worn it so often now, receiving compliments every time, and I have the fabric ready to make a second one. The only thing I’d do differently next time is omit the invisible side zip. I don’t use it as I can pull the jumpsuit on and off without it, so it would save me time and effort to just miss this step out. If you haven’t tried the Marigold yet, I’d highly recommend it!
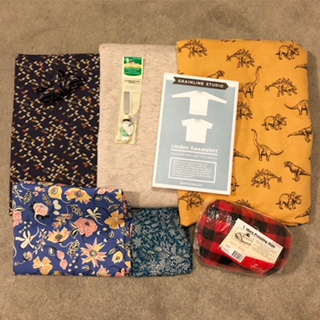 I’ve admired it online in photos and videos for so long but FINALLY got to experience the real thing a couple of months ago. There is not only a beautiful range of fabrics but also an incredible selection of indie patterns and haberdashery items. Lauren and her staff were all so lovely and helpful. The only difficulty I had was trying to rein myself in! I did treat myself to a few pieces though, it would have been a shame not to.

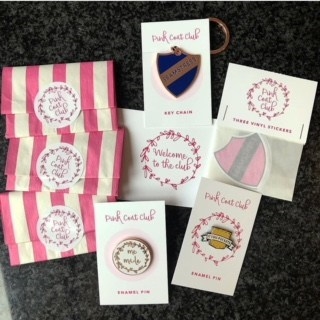 y day! I’ve admired the gorgeous products from Joy (